[LLM] 11. Multi-Head Attention
Multi-Head Attention
Multi Head Attention이 뭐냐면 어려운 말로 하자면 Self-Attention을 여러 개 병렬로 수행하여 더 풍부한 문맥 정보를 학습할 수 있도록 하는 것입니다.
간단하게 말하면 Self-Attention을 하면 하나의 관점에서만 Score가 나오는데 그러면 여러 관점을 갖지 못하니까 여러 관점에서 점수를 구할 수 있도록 하는 것이 Multi-Head-Attention 입니다.
간단한 예시
아래 문장이 있을 때 Multi-Head-Attnetion을 한다고 보면
- "강아지가 공원에서 신나게 뛰어다닌다"
  - "강아지"가 뭐하니? -> "뛰어다닌다"
  - "어디에서?" -> "공원에서"
  - "기분이 어때?" -> "신나게"
와 같습니다.
왜 쓰나?
Self-Attention만 사용하면 토큰을 한가지 방식으로만 이해합니다. Multi-Head Attention을 사용하면 여러 개의 Self-Attention을 사용하는 것과 같기에 다양한 패턴을 학습할 수 있습니다.
그래서 다양한 관점을 누가 정하는데
Q,K,V 행렬이 정한다고 할 수 있습니다. Self-Attention도 의미 파악을 위해 Q,K,V가 관여했잖아요. 그거와 같아요. 이 문장만 보면 한가지 의문이 더 들수 있습니다. "그럼 어떤 관점인지를 어떻게 정하나?"라는 의문이 들었었는데. 찾아보니 이는 사람이 지정해줄 수는 없고 랜덤한 값으로 시작하여. 역전파를 통한 미세조정이 이루어져야 한다고 합니다.
실습 코드
import torch
import torch.nn as nn
import numpy as np
import pandas as pd
import matplotlib.pyplot as plt
import seaborn as sns
# import ace_tools as tools

# Multi-Head Attention 구현
class MultiHeadAttention(nn.Module):
    def __init__(self, d_model, num_heads):
        super().__init__()
        assert d_model % num_heads == 0  # Head 수가 나누어 떨어지도록 설정
        self.num_heads = num_heads
        self.head_dim = d_model // num_heads

        # Query, Key, Value 행렬 생성
        self.W_query = nn.Linear(d_model, d_model)
        self.W_key = nn.Linear(d_model, d_model)
        self.W_value = nn.Linear(d_model, d_model)
        self.out_proj = nn.Linear(d_model, d_model)  # 최종 출력 변환

    def forward(self, x):
        batch_size, seq_length, d_model = x.shape

        # Query, Key, Value 생성 및 Head 분할
        Q = self.W_query(x).view(batch_size, seq_length, self.num_heads, self.head_dim).transpose(1, 2)
        K = self.W_key(x).view(batch_size, seq_length, self.num_heads, self.head_dim).transpose(1, 2)
        V = self.W_value(x).view(batch_size, seq_length, self.num_heads, self.head_dim).transpose(1, 2)

        # Scaled Dot-Product Attention 수행
        attn_scores = (Q @ K.transpose(-2, -1)) / (self.head_dim ** 0.5)
        attn_weights = torch.softmax(attn_scores, dim=-1)
        context = attn_weights @ V  # 값 조합

        # Multi-Head Attention 결과 결합
        context = context.transpose(1, 2).contiguous().view(batch_size, seq_length, d_model)
        return self.out_proj(context), attn_weights

# 랜덤 입력 데이터 생성 및 실행 예제
torch.manual_seed(42)
batch_size, seq_length, d_model, num_heads = 1, 6, 8, 2  # 한 문장에 6개의 토큰, 8차원 벡터, 2개의 Head 사용
x = torch.randn(batch_size, seq_length, d_model)  # 랜덤 입력 데이터

# Multi-Head Attention 실행
mha = MultiHeadAttention(d_model, num_heads)
output, attention_weights = mha(x)

# Attention 가중치 시각화
for head in range(num_heads):
    plt.figure(figsize=(6, 5))
    sns.heatmap(attention_weights[0, head].detach().numpy(), annot=True, cmap="Blues", xticklabels=[f"T{i}" for i in range(seq_length)], yticklabels=[f"T{i}" for i in range(seq_length)])
    plt.title(f"Attention Head {head + 1}")
    plt.xlabel("Key Tokens")
    plt.ylabel("Query Tokens")
    plt.show()

# Attention 가중치 데이터프레임 출력
attn_df_head1 = pd.DataFrame(attention_weights[0, 0].detach().numpy(), columns=[f"T{i}" for i in range(seq_length)])
attn_df_head2 = pd.DataFrame(attention_weights[0, 1].detach().numpy(), columns=[f"T{i}" for i in range(seq_length)])

# tools.display_dataframe_to_user(name="Attention Weights - Head 1", dataframe=attn_df_head1)
# tools.display_dataframe_to_user(name="Attention Weights - Head 2", dataframe=attn_df_head2)

print("Attention Weights - Head 1")
print(attn_df_head1)
print("\nAttention Weights - Head 2")
print(attn_df_head2)
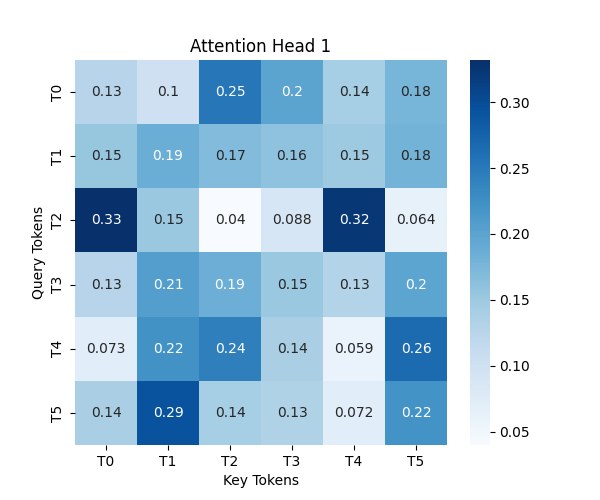
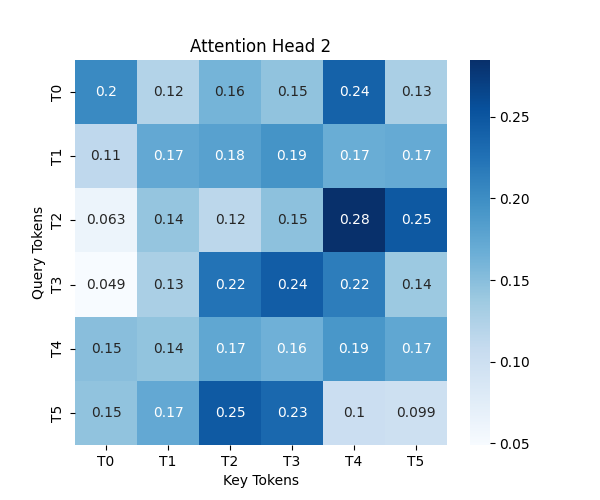
보면 Head1과 Head2의 연관도 패턴이 다른걸 볼 수 있습니다.
결론
Multi-Head Attention은 Self-Attention만 쓰면 효율이 안나오니 병렬처리 해가지구 효율을 극대화한 방법 같습니다.